Showing posts with label cooking. Show all posts

Saturday, October 30, 2010

Vegetable beef soup

I hate to waste anything, so the other night when we had a bone in chuck steak, I vowed not to waste any of it.  Today I took the rest of the steak and bones and threw them in a pot with a bunch of veggies, a jar of canned tomatoes and a jar of the beef stock I made when we got the cow.  The result is rather delicious. 

This is what is left after I took some to Hubby at the Fire Station and the kids and I had some.  The recipe was made up, but I'll do my best.

Vegetable beef soup

Leftover bones and meat from a chuck steak, maybe a cup of meat.
1qt tomatoes
1qt beef stock
3 potatoes cut into 1 inch cubes
2-3 carrots cut up
1 qt of beans
1 can of corn
1 small onion diced
1 large clove garlic
water to cover and salt and pepper to taste. 

I basically just threw it together and let it simmer.  After a while, I pulled the meat out and cut it up into small pieces.  It's very yummy and comforting on this cool, fall day.

Sunday, January 3, 2010

Food Goals for the Year

Going right along with my garden goals from yesterday are my food goals for the year.  They certainly go hand in hand with the garden goals.  These are things that we've been working on for the past few years and every year I try to expand on things. 

1.  Expand my repertoire of breads.  I can already make a rather nice loaf of bread, so it's time to move on to bigger and better things.  We're talking bagels, pita breads and crackers.  I've been having a great time grinding my own flour recently.  I only grind a small amount (say 3-5 pounds) at a time, so that it can be used up before it loses its freshness.  I would love to not have to buy bread or crackers from the store.  I also need to perfect my tortilla making skills.  When I made them the first time, they were yummy, but a bit thick and oddly shaped. 

2.  Learn to make cheese and butter.  We are fortunate to live near a wonderful dairy farm.  We get raw milk from pasteured cows.  The price is amazing as well.  I guess when you don't pay for feed, you can sell for less.  It's wonderful stuff.  Now to learn to make some other wonderful things from it.  There is a woman in the western part of my state who does classes.  It will entail a weekend away, I guess I'll have to suffer through it. 

3. Learn how to forage for wild edibles in my area.  Again, we are fortunate to have a man nearby who does classes on such things.  I have self identified a few things in my yard, but would like someone who isn't looking at a computer picture to tell me what they are.  I think it would be wonderful to use some of the weeds growing quite plentifully in my yard and garden for something other than compost.  It is really amazing how many weeds one has in their yard when she doesn't use chemicals.  It is also really amazing how many weeds one has in their yard when they just simply don't care.  The neighbor with the perfectly manicured Scotts lawn loves me.

4.  Try my hand at fermentation.  I keep reading all these wonderful tales of fermented foods and the wonderful things they do for our bodies.  Being someone who loves pickles, saurkraut, kefir and kombucha, it would be wonderful to be able to make these things myself.  It should save me quite a bit of money as well.  That is always a great side effect.

5.  Learn to make my own pasta.  I have the machine, I just need to do it. 

Now looking back at this post, I realize that I'm slightly off my rocker.  I think that most of the people that read this blog are slightly off their rocker as well.  So, here's to being off our rockers!  Rock on!!

Wednesday, December 2, 2009

Time for reading


This is the time of the year that I actually have a few minutes to sit down and read up on things.  I love books, and have a bad habit of needing to own them all.   The picture above shows a sampling of the many books I own.  I love books on gardening, homesteading, preserving, frugality, and well, you get the idea.

At the library yesterday, there was a copy of John Jeavons book, The Sustainable Vegetable Garden.  Its very interesting and extremely detailed.  I need more though.  My library is pretty pathetic these days as a result of budget cuts, but I have lots of credits on paperbackswap.com. 

Some books that I really love are in the picture above.  Carla Emery's Encyclopedia of Country Living is amazing.  There is so much information in that book on everything from gardening to being frugal, cooking, preserving and raising and butchering animals.  Just amazing.

I also really love Eliot Coleman's book Four Season Harvest.  It has so much practical information on season extension for your garden. 

The frugalista in me loves The Tightwad Gazette.  Its funny to read it, since although it was written about 15 years ago, the economy was doing poorly then and there were lots of people looking into the frugal lifestyle.  Her basic recipes are wonderful to make something from just about any ingredients you happen to have laying around.  Some things are outdated, but overall its a wonderful resource. 

Some other good ones are Seed to Seed by Suzanne Ashworth.  My sister in law is currently borrowing it, so it isn't pictured.  It has everything you ever wanted to know about saving your own seed.  Then there are all the preserving books, like Root Cellaring by the Bubels, Mary Bell's Complete Dehydrator cookbook and Ball's complete book of Home Preserving. 

Recently I've been reading more on the local food and sustainability fronts.  Sharon Astyk has 3 books out right now with a fourth on the way, so far my favorite has been Independence Days.  I also really enjoyed Animal, Vegetable, Mineral by Barbara Kingsolver and The Omnivore's Dilemma by Michael Pollan. 

Please share some of your favorites with me.

Wednesday, November 25, 2009

MMM, pie


I'm thankful for Chocolate Pecan Pie.  It is about as non-local a food as I can get and I love it.  I'm so thankful for all that my life holds.  I hope your Thanksgiving is as wonderful as it should be.

Saturday, November 21, 2009

Making pumpkin puree

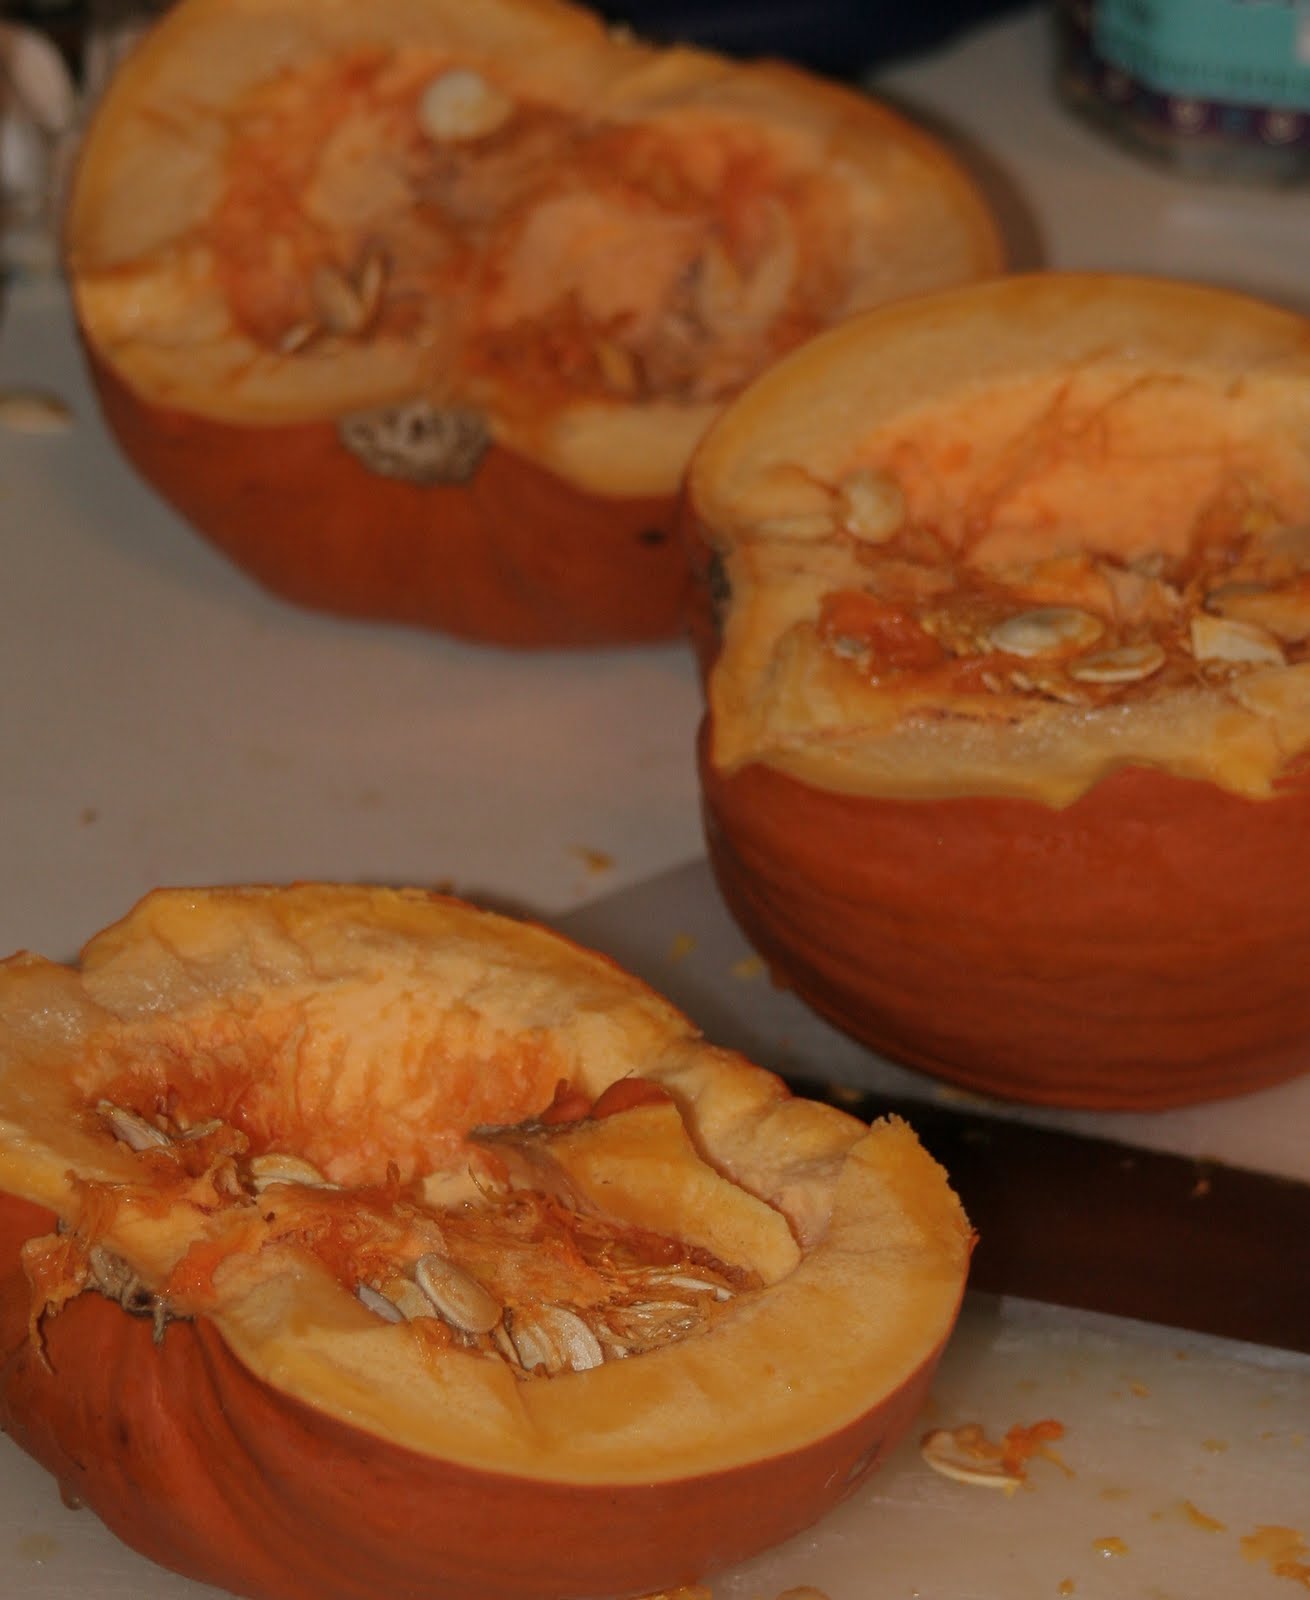
One of the things I'm asked a lot, is how to process pumpkins.  Its very easy and while the whole process takes a while, it doesn't take much of your actual hands on time.  We got these pumpkins on a field trip with our wonderful nature club.  They've decorated the house for about a month and its time for them to do their part. 

First you need to wash the outside of the pumpkin.  They can get dirty and you don't want that in your food.

Then cut them in half.  This is actually harder than it looks.  The shells of pie pumpkins are very hard.  Hubby used my cleaver to whack these pumpkins for me.  We ended up with shards of pumpkin and seeds all over the place.  You then scrape the guts out.  I saved some seeds for next year's garden.  I'll show the process in another post.  The remaining seeds and insides went to the chickens, although you may want to roast the seeds.  My family isn't big on pumpkin seeds, but the chickens are.


Then lay the pumpkins cut side down in a baking pan.  I slide it in the oven and then put about a quarter of an inch of water in the pan to help them steam.  Let them bake at 350 for about 50-60 minutes.  Then pull them out and let them cool for 30 minutes so that they can be safely handled.


Scoop the flesh out and put it into the food processor or blender to break up the strings.


I then put the pureed pumpkin into a colander lined with paper towels or cheesecloth.  There is a remarkable amount of water in that pumpkin, so be sure to do this step.


Lastly, package it up.  I like to put mine in bags with 2 C of puree, the same amount in a can of pumpkin.  They can be stored in the freezer for quite a while.  Ours is usually gone by the following summer.  I got 6 cups of puree from 3 medium sized pie pumpkins.  Considering how many pumpkins will grow from just a few seeds, its not a bad option for the garden.  

Tuesday, November 17, 2009

Pasta e Fagioli soup

One of my readers, Karen Sue, requested the recipe for this soup.  Its a knock off of a similar soup found in a certain restaurant that serves soup, salad and breadsticks.  My kids have loved it forever and a few years ago, I decided I'd rather make my own.  This is what I've come up with.  Its been adjusted several times over the years, but is pretty easy.  It ends up being like an Italian chili with pasta.  Mine is pretty thick, but you could certainly thin it out. 

Past e Fagioli

1 lb ground beef
2 carrots grated
1 small onion chopped
3-6 cloves garlic
4 cups swiss chard (this will melt down to about 1 cup of cooked chard)
1 qt pasta sauce (use anything you like)
1 qt tomatoes
1 t oregano
1 t basil
1/4 t hot pepper flakes
1 can kidney beans
1 can cannelini beans
2 cups beef stock
pasta of your choice

Brown beef and veggies in large stockpot.  Add remaining ingredients and salt and pepper to taste.  Let simmer for 2- 3 hours.  Serve with pasta.

I always keep the pasta and soup separate until serving.  This will allow the pasta to retain its shape and not get soft if the soup is not all eaten at once.  I also will can this up without the pasta.  To do so you need to thin out the soup, so that it is less chili- like in consistency.  Pour into prepared jars and process at 11 lbs pressure for 75 minutes for pints and 90 minutes for quarts in the pressure canner.  If I'm making a large batch for canning, I also don't let it simmer for 2 hours since it will cook so much in the pressure canner.

This post is part of Whole Foods for the Holidays.  Hop on over to Gnowfglins to check out what others are cooking up.

Wednesday, November 11, 2009

Who doesn't like homemade bread?

I love bread.  Its something my mother has almost always made from scratch.   Although she will deny it, she was a bit of a hippy in her day.  I grew up with homemade bread made from flour that she would buy in huge bags and store in trash barrels in the basement.  She would make white, oatmeal, rye and cinnamon raisin breads.  She has never been much of a whole wheat girl.  I remember when I was 8, going to school with my tuna fish on homemade white bread.  It was delicious, but everyone else had wonder bread, and so I thought I should too.  Silly me.

Now, it seems ridiculous that I would want something so awful.  There is nothing better than the smell of rising and baking bread.  The anticipation of that first slice to be slathered in butter, honey or homemade jam.  I can never wait as long as I should.  What I make however, is wheat bread.  Warm and nutty.

Since I had the canning class this summer, I've been asked to teach bread baking.  Time has gotten away from me, so I thought I'd post the recipe here.  The recipe is my mother's, but I've made quite a few changes over the years.

Whole Wheat Bread

3 C warm water ( you can use milk)
1/4 C honey
1 T salt
2 T yeast ( I use active dry)
7- 8 C flour ( can be all white, all wheat, or a combination)
Whole grain bread improver  1 T per cup of whole wheat flour used (optional)

Combine first 4 ingredients in bowl with 2 cups flour and whole grain bread improver if desired.  Beat for 2 minutes.
Add remaining flour until you have a nice cohesive dough.  You do not want it too dry.
Knead with Kitchen Aid or by hand for 8- 10 minutes.
Place dough in greased bowl, rolling dough in oil to make sure it is coated on all sides.  Place a clean kitchen towel on top and place in a warm place for 1 hour, or until dough has doubled in size.
Divide dough in half.
Gently flatten dough into a roughly 12x 6 rectangle.  Roll dough into a cylinder and place in greased bread pan.  Do this for each half.  You will now have 2 loaves.
Oil the top of the loaves and place kitchen towel on top.  Allow to rise for another hour.
Bake at 375 for 35-45 minutes.
When done, remove loaves immediately and allow to cool on a rack.
Try to be better than I am and don't slice into it for at least 15 minutes.

Notes
I generally make this with water instead of milk.  You can add up to 1 cup of oats, or other grains to replace some of the flour.  I almost never make this 100% whole wheat.  My family likes it best 50/50.

Thursday, November 5, 2009

Veggie egg rolls


These are a favorite at my house.  Last night I took them to a potluck dinner our homeschooling Moms had.  Everyone loved them and I was asked for the recipe.  Aside from a bit of chopping, they are pretty simple to make.

Veggie Egg Rolls

1 T olive oil
1/2 small onion diced
1 small head cabbage chopped
2 cup carrots shredded
2 cups green beans chopped
3 cloves garlic minced
1 T veggie bouillon (or chicken)
2 T hoisin sauce
2 T brown sugar
2 t toasted sesame oil
2 T soy sauce
3 T cornstarch
black pepper to taste
1 egg beaten
1 package egg roll wrappers

Saute veggies in olive oil until just softened.  Add bouillon, hoisin, brown sugar and sesame oil, stir to combine.  In small dish combine soy sauce and cornstarch to make a slurry.  Add to mixture until thickened.  Season to taste.  Let mixture cool slightly then fill egg roll wrappers.  Place the wrapper so that it forms a diamond.  Place 2 T of filling in the lower half of the wrapper.  Fold bottom corner up and tuck it back against the filling.  Fold in the sides to keep filling in.  Brush beaten egg on top corner and fold the egg roll the rest of the way up. 

These can be baked or fried.  They are pictured baked.  To fry heat oil to 350 and fry until golden brown.  To bake, grease cookie sheet and place rolls onto greased sheet.  Brush tops with olive oil and place in 400 degree oven for 15-20 minutes or until golden brown. 

Dipping sauce

1 t crystallized ginger finely diced
1/2 cup rice wine vinegar
1/2 cup soy sauce
1/2 t red pepper flakes

Combine ingredients and let sit for a few minutes to meld flavors. 

Notes

I've played with this recipe a lot and have found that you can use just about any kind of cabbage, most veggies and can even add meat.  If you wish, you can add up to 2 cups of meat or chopped shrimp.  My family loves this the best with 1/2 cup of shrimp added.  This filling is also good over rice or rice noodles.